Navigation menus are the backbone of any WordPress website, guiding visitors through your content and improving their overall experience. Beyond usability, a well-crafted menu enhances your site’s SEO by making it easier for search engines to index your pages. In this guide, we’ll walk you through the essentials of WordPress menu management, from creating navigation menus to utilizing advanced menu properties, ensuring your site is both user-friendly and SEO-optimized.
WordPress provides a powerful and intuitive menu editor to help you design a navigation structure tailored to your site’s needs. Let’s explore the key steps to create and manage navigation menus.
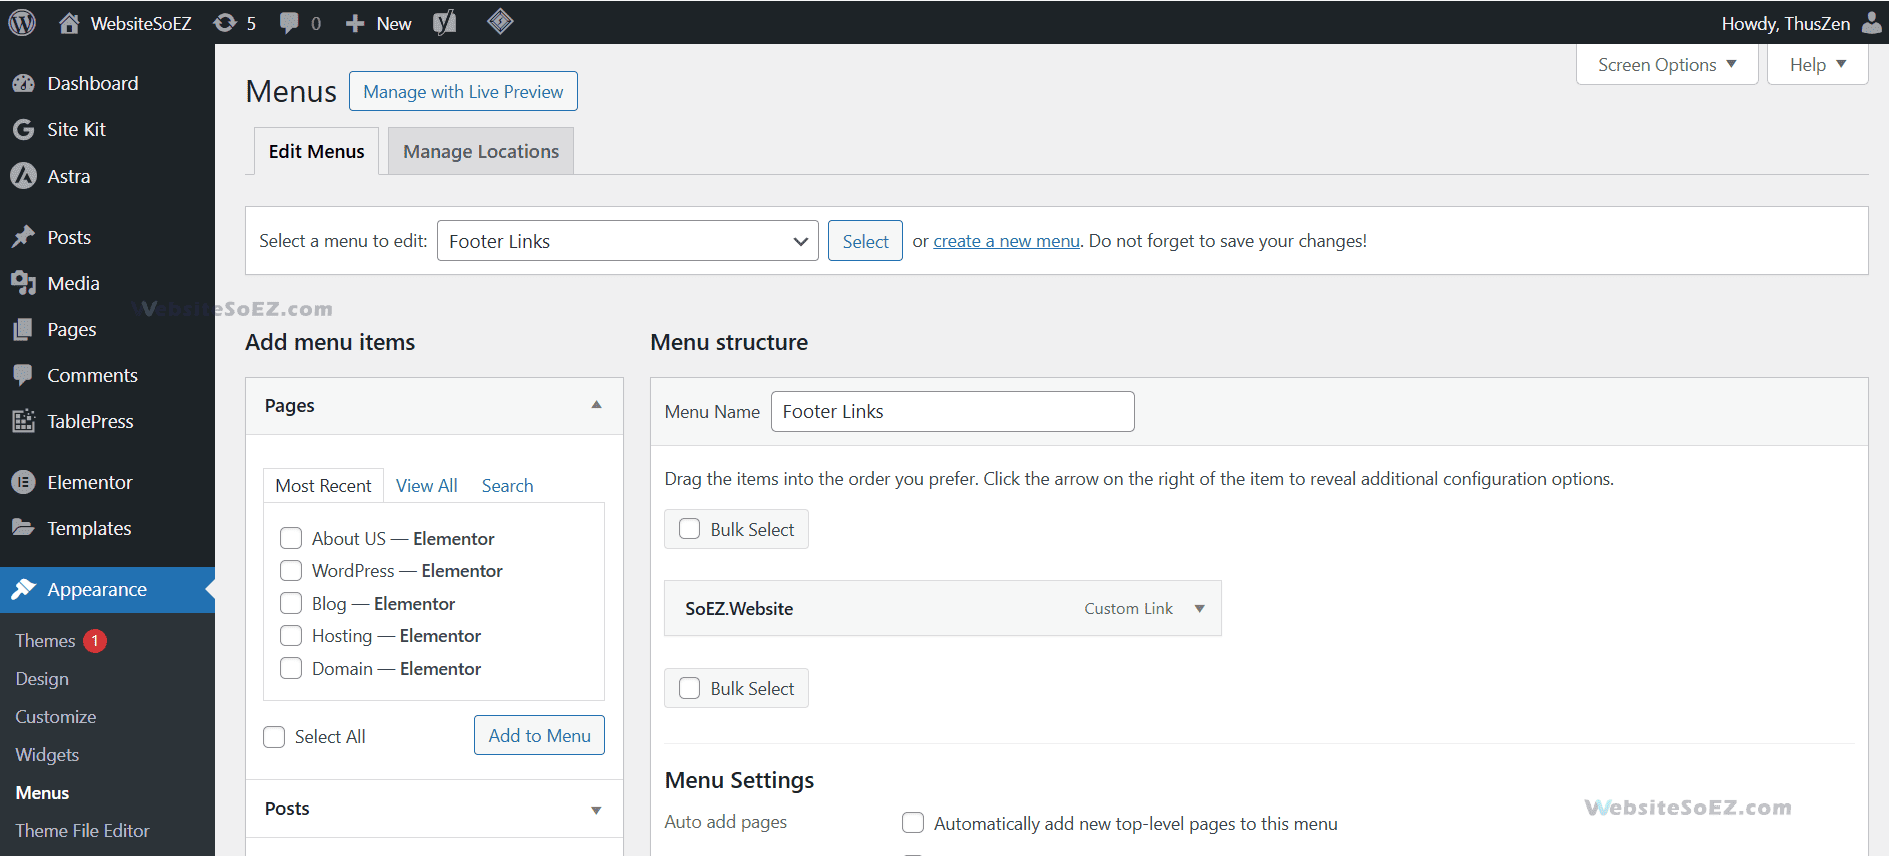
1.1 Creating a New Menu
To get started with creating a new menu, follow these steps:
- Log in to your WordPress dashboard.
- Go to Appearance > Menus in the left-hand sidebar.
- Click the “create a new menu” link at the top of the page.
- Enter a name for your menu (e.g., “Primary Navigation” or “Footer Links”) to identify it easily later.
- Click “Create Menu” to launch the editor.
This process lays the groundwork for building your site’s navigation system.
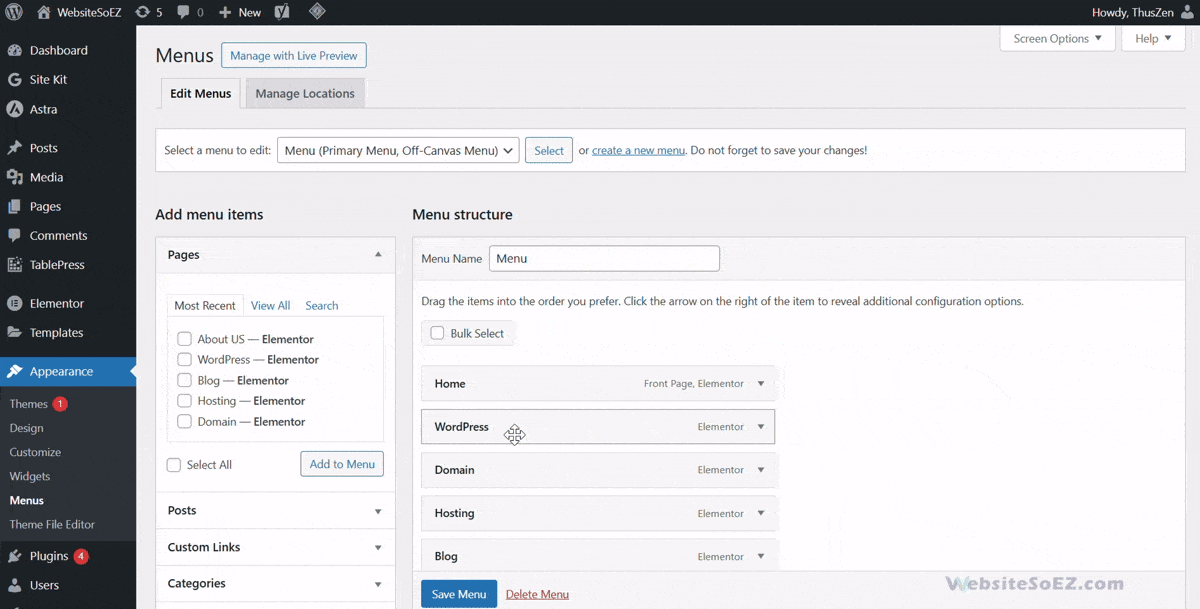
1.2 Adding Items to the Menu
After creating your menu, you can populate it with various types of content. WordPress supports adding pages, posts, custom links, and categories to your navigation.
- Pages: In the left-hand panel, select key pages like “Home” or “Services,” then click “Add to Menu”.
- Posts: Highlight specific blog posts by selecting them from the “Posts” section and adding them.
- Custom Links: Link to external sites or specific sections by entering a URL (e.g., https://example.com) and a label (e.g., “Our Blog”), then adding it to the menu.
- Categories: Organize content by adding categories like “News” or “Tutorials” from the “Categories” panel.
Once added, these items appear in the menu editor, ready for further customization.
1.3 Adjusting Menu Item Order and Hierarchy
A logical menu structure improves navigation and user satisfaction. WordPress’s drag-and-drop functionality makes it simple to adjust.
- Adjusting Order: Click and drag menu items to rearrange them. For instance, place “Home” first or “Contact” last.
- Creating Submenus: Drag an item slightly to the right under another to create a dropdown submenu. For example, under “Shop,” add subitems like “Clothing” and “Accessories.”
This flexibility ensures your navigation menus are both intuitive and visually appealing.
2. Managing Menu Locations (Theme Locations)
WordPress themes often support multiple menu locations, such as the header, footer, or sidebar. Assigning menus to these locations ensures they display correctly across your site.
In the menu editor, look for the “Menu Settings” section, which lists available theme locations (e.g., “Primary Menu” or “Footer Menu”). To assign a menu:
- Select or create a menu (e.g., “Main Navigation”).
- Check the box for the desired location under “Menu Settings.”
- Click “Save Menu” and refresh your site to confirm the placement.
Properly managing menu locations creates a seamless navigation experience tailored to your theme.
3. Advanced Menu Properties
For more control over your menus, WordPress offers advanced menu properties. These features allow you to fine-tune functionality and appearance.
Enabling Advanced Properties
By default, these options are hidden. To enable them:
- In the menu editor, click “Screen Options” at the top-right corner.
- Check boxes for options like “CSS Classes,” “Link Target,” or “Title Attribute.”
- Save your changes to see these settings in each menu item’s panel.
Key Advanced Properties
- CSS Classes: Assign custom classes (e.g., special-item) to style specific menu items with your theme’s CSS.
- Link Target: Set links to open in a new tab by selecting _blank, keeping users on your site longer.
- Title Attribute: Add hover text (e.g., “Explore our blog”) to improve accessibility and include SEO keywords.
These enhancements make your menus more dynamic and user-friendly.
Conclusion
Effective WordPress menu management transforms your website into a navigable, SEO-friendly hub. By creating navigation menus, organizing them with submenus, assigning them to theme locations, and leveraging advanced properties, you can craft a navigation system that delights users and boosts search engine rankings. Start implementing these techniques today to optimize your site’s user experience and keep visitors engaged!