Welcome to the control center of your website: the WordPress Control Panel. For anyone new to the platform, this administrative area is where all the magic happens—from publishing content to customizing your site’s appearance and functionality. This WordPress backend introduction will guide you through the essential first steps, from logging in to understanding the key components of your dashboard. Let’s dive in and demystify your new digital workspace.
1. Logging Into the WordPress Backend
Before you can manage your site, you need to know how to access it. The login process is your gateway to all WordPress Control Panel settings and features.
1.1 The Default Login Address
For a standard WordPress installation, you can access your login page by simply adding one of the following suffixes to your website’s domain name:
/wp-admin/wp-login.php
For example, if your website is websitesoez.com , you would navigate to websitesoez.com/wp-admin or websitesoez.com/wp-login.php . It’s a good practice to bookmark this URL for quick and easy access in the future. Once there, you will be prompted to enter the username and password you created during the WordPress setup process.
1.2 What to Do If You Forget Your Password
It’s a common issue, but thankfully, one with a simple solution. If you can’t recall your password, click the “Lost your password?” link found just below the login form. You will be asked to enter your username or email address associated with the account. WordPress will then send a password reset link to your registered email, allowing you to create a new password and regain access to your backend.
2. Introduction to the Dashboard Interface
After logging in, the first screen you’ll see is the main Dashboard. Think of this as your website’s command center, offering a high-level overview of your site’s status and recent activity through various modules, also known as widgets.
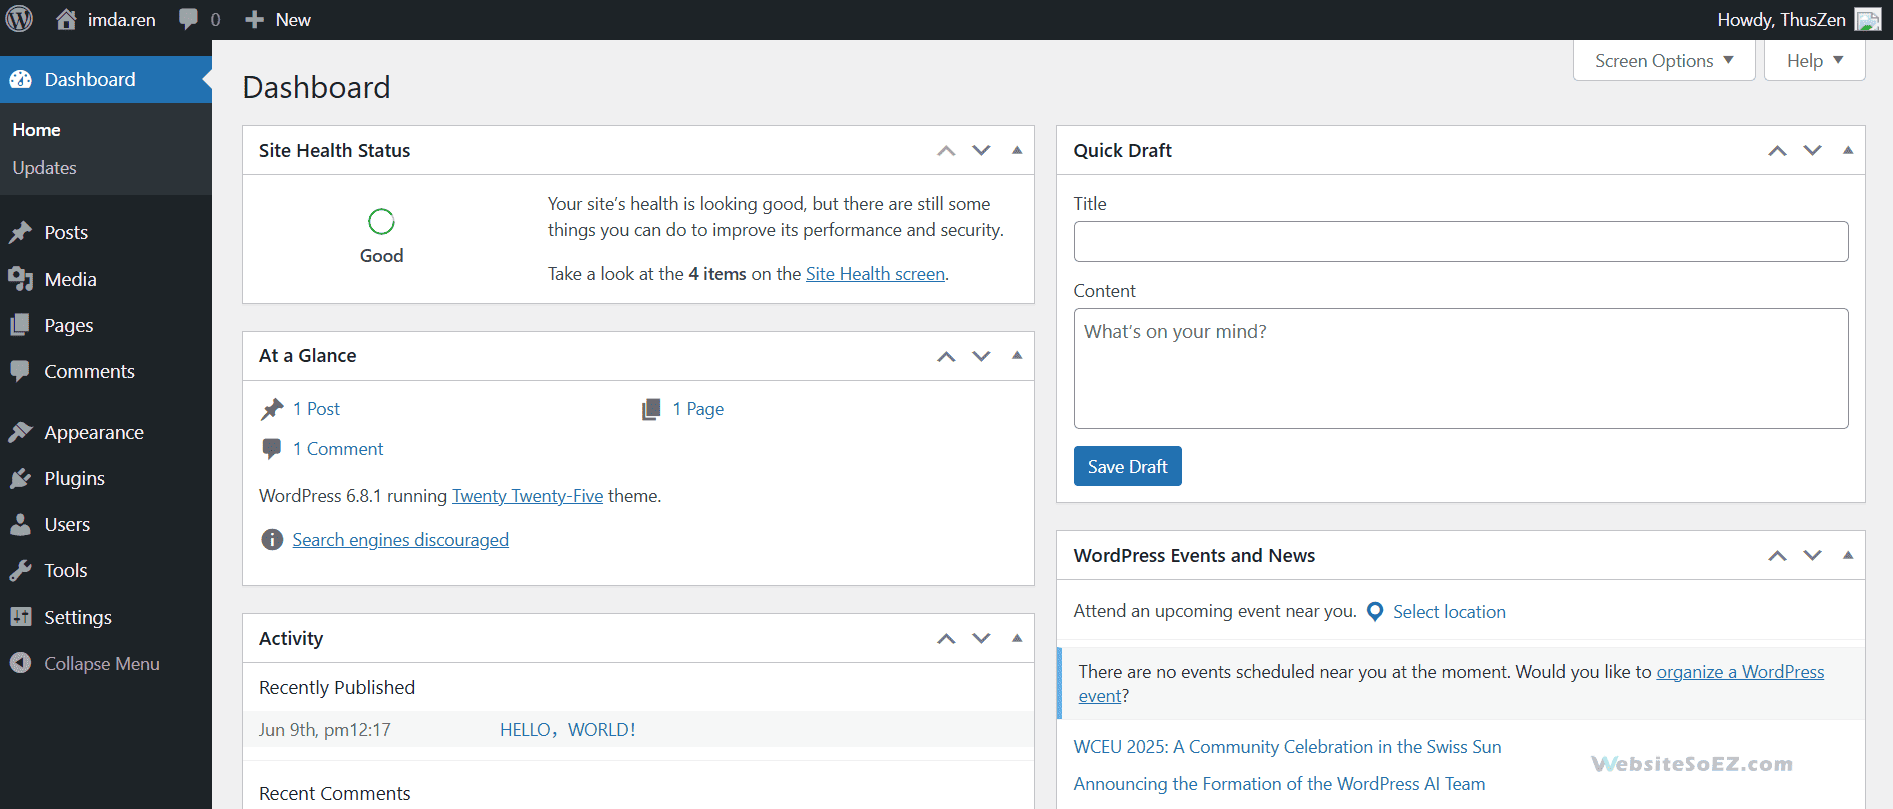
2.1 The “At a Glance” Module
This module provides a quick summary of your website’s content. It shows you the total number of posts, pages, and comments on your site. It also displays your current WordPress version and the theme you are running, which is crucial for knowing when updates are needed for security and performance.
2.2 The “Activity” Module
The “Activity” module gives you a snapshot of the most recent actions on your site. It displays your latest published posts and the most recent comments from your visitors. This allows you to quickly see new engagement and moderate comments directly from the dashboard.
2.3 The “Quick Draft” Module
Have a sudden idea for a blog post? The “Quick Draft” module is your space for instantly capturing it. You can write a title and a few notes and save it as a draft without navigating to the full post editor. It’s a perfect tool for ensuring no great idea gets lost.
2.4 The “WordPress Events and News” Module
Stay connected with the broader WordPress community through this module. It displays the latest news and updates from the official WordPress project, as well as upcoming WordPress events like WordCamps and meetups near your location.
2.5 Customizing Your Dashboard with “Screen Options”
Your dashboard can be tailored to your workflow. In the top-right corner of the screen, you will find a tab labeled “Screen Options.” Clicking this reveals a list of all available dashboard modules. You can check or uncheck the boxes to show or hide different modules. You can also click and drag the modules to rearrange them on the screen, creating a personalized and efficient workspace.

3. The Top Toolbar (Admin Bar)
When you are logged into your WordPress Control Panel, you will notice a horizontal black bar at the very top of the screen. This is the Admin Bar, and it provides convenient, one-click shortcuts to key administrative functions. Whether you are viewing your Control Panel or the live version of your site, the Admin Bar gives you quick access to create a new post or page, manage comments, or access key site settings.
The primary tool for navigating the entire WordPress Control Panel is the main menu located on the left-hand side of the screen. This vertical menu is the most critical part of your backend introduction, as it is your roadmap to every single setting and feature. It is logically organized into sections such as:
- Dashboard: Takes you back to the main dashboard screen.
- Posts: Where you write, edit, and organize all of your blog posts.
- Media: The library for all your uploaded images, videos, and files.
- Pages: Used to create and manage static pages like “About Us” or “Contact.”
- Comments: Where you can moderate all user comments.
- Appearance: Allows you to change your theme, customize your site’s design, manage widgets, and edit menus.
- Plugins: Add, remove, and manage all plugins to extend your site’s functionality.
- Users: Manage all user accounts on your website.
- Tools: Contains tools for tasks like importing and exporting content.
- Settings: The central hub for all core WordPress Control Panel settings, including general site information (like your site title), writing and reading settings, permalink structures, and more.
By taking the time to explore each of these menu items, you will gain a comprehensive understanding of your site’s capabilities and build the confidence to manage it effectively.
Getting comfortable with the WordPress Admin Panel is a key step in building and managing a successful website. Whether you’re editing posts, customizing your theme, or managing plugins, the dashboard is your central hub. By understanding how each element works — from the admin bar to backend settings — you can streamline your workflow and unlock the full potential of WordPress.
If you’re just starting out, consider bookmarking this guide or exploring our full WordPress tutorial series to master each section of the admin panel step-by-step.