The main reason for migrating the website from shared hosting to a VPS was the slow loading speed. However, after the migration, the performance improvement was minimal, likely because the VPS did not offer much better hardware than the shared hosting, so the acceleration effect was not obvious. Since the site traffic is not high, there’s no need to upgrade to a more powerful server. Instead, I decided to enable Nginx’s native fastcgi_cache feature. Once configured, the website speed improved dramatically—most pages now load in under one second, delivering a noticeably better user experience.

This article will explain how to configure fastcgi_cache for multiple sites in aaPanel, and in the next article, I will cover how to automatically pre-warm the cache.
1. What Does WordPress Performance Optimization Usually Include?
Before optimizing WordPress performance, the first task is to understand the current access performance of your website. In addition to the user’s subjective experience, we should also rely on a set of tools for objective analysis. The following tools are recommended for evaluating page load speed and resource utilization efficiency:
- Browser Developer Tools (e.g., Chrome DevTools)
- Google PageSpeed Insights
- Pingdom Website Speed Test
These tools provide comprehensive performance scores and optimization suggestions, making them suitable for page-level evaluation. In addition, it is also recommended to observe backend data. For example, you can insert the following code after </body> in your theme’s footer.php file., to display the number of database queries executed on the page:
<!--<?php echo get_num_queries().' queries, executed in '.timer_stop(0).' seconds.'; ?>-->
<!-- Commenting out the above line as HTML does not affect its functionality, while keeping it hidden on the front-end page -->
Using Edge or Chrome Developer Tools, follow these steps:
- Press F12 or Ctrl+Shift+I to open Developer Tools.
- Switch to the Network tab.
- Check the Disable cache option.
- Refresh the page.
This allows you to more accurately view:
- The total number of requests made during page loading.
- The loading time of various resources.
- The number of database queries.
- Key metrics such as the overall page load time.
Based on the data analysis above, we can more precisely identify performance bottlenecks, providing a solid foundation for subsequent cache configuration and resource compression. For WordPress site performance optimization, the following key areas should typically be addressed:
- Server performance scaling — upgrading hardware, increasing bandwidth, and optimizing database performance.
- Static resource optimization — compressing images, combining and minifying CSS/JS files, and making effective use of browser caching.
- Content Delivery Network (CDN) — leveraging global nodes to accelerate static resource distribution and reduce server load.
- Lazy loading — deferring the loading of non-visible images and resources to reduce the pressure of initial rendering.
- System code optimization — streamlining and refining WordPress theme and plugin code to avoid unnecessary queries and requests.
- Caching mechanisms — applying multi-layer caching strategies, including page cache, object cache, and database query cache.
- Server configuration optimization — such as fine-tuning Nginx settings and PHP-FPM parameters.
2. Configuring the ngx_cache_purge Module in aaPanel Nginx
Nginx’s FastCGI Cache is used to cache dynamically generated content from user requests. When a user revisits the same page, Nginx can directly return the cached result, reducing the number of database queries and significantly improving service performance. For cacheable dynamic pages or static resources, enabling this module not only shortens response times but also conserves server resources and increases the system’s QPS (queries per second) capacity.
When installing Nginx via the aaPanel, the ngx_cache_purge module is already compiled and pre-installed by default. You can confirm whether the module has been correctly loaded by running the following command in the SSH terminal:
root@ThusZen:~# nginx -V 2>&1 | grep -o ngx_cache_purge
ngx_cache_purge
If the command output contains ngx_cache_purge, it means the module has been successfully compiled and is available.
In the aaPanel, go to App Store → Nginx → Settings, locate the server configuration block, and add the following configuration above that block (do not place it inside the server block):
# =========================
# Nginx FastCGI Cache Configuration
# =========================

# Temporary file directory (shared by all websites)
fastcgi_temp_path /www/cache/fastcgi_cache/temp;

# Cache for thuszen.com
fastcgi_cache_path /www/cache/fastcgi_cache/thuszen levels=1:2 keys_zone=thuszen_cache:50m inactive=3d max_size=2g;

# Cache for soez.world
fastcgi_cache_path /www/cache/fastcgi_cache/soezworld levels=1:2 keys_zone=soezworld_cache:50m inactive=3d max_size=2g;

# Cache for oddbbo.world
fastcgi_cache_path /www/cache/fastcgi_cache/oddbboworld levels=1:2 keys_zone=oddbboworld_cache:50m inactive=3d max_size=2g;

# Cache for websitesoez.com
fastcgi_cache_path /www/cache/fastcgi_cache/websitesoez levels=1:2 keys_zone=websitesoez_cache:50m inactive=3d max_size=2g;

# Cache for oddbbo.com (WooCommerce, shorter cache time)
fastcgi_cache_path /www/cache/fastcgi_cache/oddbbo levels=1:2 keys_zone=oddbbo_cache:100m inactive=3d max_size=2g;

# Use stale cache when encountering errors or timeouts
fastcgi_cache_use_stale error timeout invalid_header http_500;

# Ignore backend cache-control headers to ensure cache effectiveness
fastcgi_ignore_headers Cache-Control Expires Set-Cookie;

# Cache key (compatible with WordPress / WooCommerce)
fastcgi_cache_key "$scheme$request_method$host$request_uri";

# nginx fastcgi cache END
The above is the Nginx FastCGI Cache configuration for my five websites. The inactive=3d parameter sets the cache expiration time; you can adjust it to 24h or 1d according to your preference. Save the configuration after setting it. If a duplicate configuration warning appears, locate the configuration file and comment out the duplicate code. Duplicate entries may exist in the file:
/www/server/panel/vhost/nginx/0.fastcgi_cache.conf
2.1 Creating the Nginx fastcgi_cache Directory
Before the configuration takes effect, you need to create the cache directories for each website and grant read/write permissions. This can be done either manually via the aaPanel or through the command line:
mkdir /www/cache/fastcgi_cache/websitesoez
chmod 755 /www/cache/fastcgi_cache/websitesoez
Do not create the cache directory inside the software installation path, such as /www/server/nginx, because updating the software may delete the cache directory. If the server has sufficient memory, it is recommended to set the cache directory in Linux’s virtual memory space /dev/shm, for example: /dev/shm/nginx-cache/websitesoez.
/dev/shm is a virtual filesystem in Linux based on shared memory (shm). All files stored in this directory are actually kept in memory rather than on traditional disks. Its capacity is not fixed but dynamically uses available system memory, allowing faster cache read/write operations and further improving caching performance.
2.2 Basic Explanation of Nginx fastcgi_cache Configuration
If the server hosts multiple websites, it is essential to set separate cache paths and keys_zone for each site. Otherwise, cache conflicts may occur, causing requests to Site A to return cached content from Site B.
- The value after keys_zone (e.g.,
100m) represents the maximum memory allocated for cache keys, which indirectly determines the maximum number of cache entries. It does not indicate the actual disk space used by cache files. - inactive defines the expiration time of cache entries; the default is usually 10 minutes.
- max_size limits the size of the temporary cache file directory.
If you plan to set the cache directory in memory (e.g., /dev/shm), pay special attention to the relationship between the server’s physical memory and the max_size setting to avoid cache overflow, which could negatively affect performance.
3. Configuring the ngx_cache_purge Module for Each Website
The last line of the Nginx configuration file, include **/*.conf;, is used to load the individual configuration files for each site. This is a common approach in aaPanel to efficiently manage multiple websites.
To allow customized cache purging rules for each site, we separate the global ngx_cache_purge configuration from the site-specific ngx_cache_purge settings. The approach is to insert the following site-specific ngx_cache_purge configuration into each website’s Nginx configuration file.
In aaPanel, go to Websites → Settings for your site, open the configuration file, and insert the following code after the #SSL-END marker:
# Nginx fastcgi_cache Configuration START
set $skip_cache 0;

# Do not cache POST requests
if ($request_method = POST) {
    set $skip_cache 1;
}

# Do not cache dynamic queries
if ($query_string != "") {
    set $skip_cache 1;
}

# Do not cache admin or special pages
if ($request_uri ~* "/wp-admin/|/xmlrpc.php|wp-.*.php|/feed/|index.php|sitemap(_index)?.xml") {
    set $skip_cache 1;
}

# Do not cache logged-in users or users who have commented
if ($http_cookie ~* "comment_author|wordpress_[a-f0-9]+|wp-postpass|wordpress_no_cache|wordpress_logged_in") {
    set $skip_cache 1;
}

location ~ [^/]\.php(/|$) {
    try_files $uri =404;
    fastcgi_pass unix:/tmp/php-cgi-84.sock;  # Replace with your PHP version
    fastcgi_index index.php;
    include fastcgi.conf;

    fastcgi_cache_bypass $skip_cache;
    fastcgi_no_cache $skip_cache;
    fastcgi_cache websitesoez_cache;   # Replace with your site-specific keys_zone
    fastcgi_cache_valid 200 301 302 3d;

    add_header X-Cache "$upstream_cache_status From $host";
    add_header Cache-Control max-age=600;  # Browser cache for 10 minutes
    add_header Last-Modified $date_gmt;
    add_header X-Frame-Options SAMEORIGIN;  # Only allow framing from the same site
    add_header X-Content-Type-Options nosniff;  # Prevent MIME type sniffing
    add_header X-XSS-Protection "1; mode=block";  # XSS protection
    etag on;
}

# Cache purge interface
location ~ /purge(/.*) {
    allow 127.0.0.1;
    allow 209.55.104.33;  # Change to your server IP address
    deny all;
    fastcgi_cache_purge websitesoez_cache "$scheme$request_method$host$1";
}
# Nginx fastcgi_cache Configuration END
3.1 WordPress Nginx fastcgi_cache Configuration Notes
- The
add_header Cache-Controldirective sets the cache control policy. If dynamic content needs to be updated in real-time, set it tono-cacheormax-age=0. If caching is allowed, you can set a longer cache duration as needed; the default unit is seconds. - Ensure the PHP-FPM socket path (
sock) is correctly configured. Otherwise, Nginx may fail to communicate with the backend PHP-FPM, resulting in a 502 Bad Gateway error. - Replace any public IP addresses in the code with your actual server IP, keeping the double quotes.
- Optional cache configuration example: if certain themes behave abnormally on mobile devices, you can disable caching for mobile requests:
# Do not cache mobile device requests
if ($http_user_agent ~* (mobile|nokia|iphone|ipad|android|samsung|htc|blackberry|windowss(ce|phone))) {
    set $skip_cache 1;
}
- If users who have posted comments still see cached pages, it is usually because WordPress does not properly recognize their cookies. To resolve this, add the following code to your theme’s
functions.phpfile to ensure logged-in users bypass the cache and receive personalized content in real time:
// Nginx cache configuration code
add_action('set_comment_cookies','coffin_set_cookies',10,3);
function coffin_set_cookies($comment, $user, $cookies_consent){
   $cookies_consent = true;
   wp_set_comment_cookies($comment, $user, $cookies_consent);
}
- When enabling fastcgi_cache, you may notice that the Cache-Control headers added in the Nginx configuration are not effective. HTTP headers may always include:
Cache-Control: no-store,no-cache,must-revalidate,post-check=0,pre-check=0
Pragma: no-cache
In this case, modify the session.cache_limiter directive in your PHP configuration file in aaPanel. Its default value is nocache; set it to none to allow the cache headers to work properly.
4. Checking the Nginx fastcgi_cache Status
If you have correctly followed the steps above and restarted Nginx, the fastcgi_cache should now be active. You can verify it using the following method:
- Press F12 or Ctrl+Shift+I to open the browser’s Developer Tools.
- Switch to the Network tab.
- Check the Disable cache option.
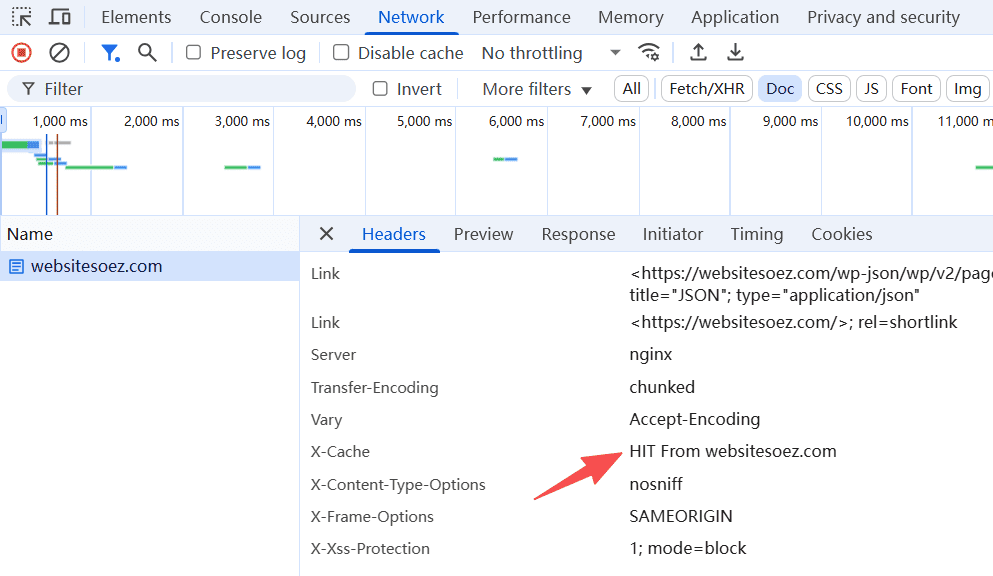
- Click on the document request for the page you are visiting and inspect the response headers.
When the cache is hit, the response headers usually include content similar to the following:
x-cache HIT
This indicates that the page content is being served from the cache, significantly improving access speed.
The X-Cache header shows that the configuration is working. It usually has three possible values: MISS, HIT, or BYPASS:
- MISS — Cache miss: the page has not been cached yet. This typically occurs on newly published pages or pages that were just deleted. The first visit will show this status.
- HIT — Cache hit: the page is served from the cache. Refreshing a non-excluded page twice usually results in this status.
- BYPASS — Not cached: the page is excluded from caching according to Nginx rules (e.g.,
set $skip_cache 1;), such as when a user is logged in.
With this, the Nginx FastCGI Cache for WordPress in aaPanel is fully configured. Open your website and enjoy millisecond-level loading speeds.Using the Nginx Helper plugin, you can automatically clear the FastCGI cache when publishing posts. By also setting up a scheduled task to prewarm the cache, it works perfectly!


